Hoplite was released in December 2013 for iOS and Android and has quickly joined the ranks of my favorite mobile games (along with 868-HACK, Drop7, and Spelltower).
I’ve been playing it since January, and it’s taken me five months of almost-daily play to unlock every achievement. My current high score is 293 at Depth 65 without having returned the fleece.
I thought I’d offer some tips based on what I’ve learned along the way. I’m writing these tips assuming you’ve played the base game at least a little.
General tips
- The best thing you can do for yourself as a Hoplite player is attempt a successful atheist run. By that I mean, attempt to get the Atheist achievement, where you return the fleece without praying at a single altar. Even if you don’t succeed, try it for a little while. Practicing this will hone your core skills and make the rest of the game a lot easier.
- Pay attention to achievements. In most games, an achievement is just a badge of honor. In Hoplite, achievements unlock crucial abilities that become available to you. Browse the achievements. If an achievement looks easy, do it. For example, the Optimal Restoration achievement is very easy to attain: on Depth 1, take two damage. Kill all remaining monsters. Jump twice, then go to the altar and choose Divine Restoration. This unlocks Shielding Bash, which is a totally badass skill.
- The basic bash move will kill enemies if you bash them into the outer walls of the level, or if you bash them into lava.
- Turns don’t happen simultaneously. There’s a priority order: you make your move, your attack happens, then the exit happens if you’ve moved to the exit, then bombs explode, then enemies attack, then enemies move. This is important to keep in mind. For example, if there’s a bomb right next to the exit, it’s safe to move to the exit, as you’ll leave the level before the bomb goes off. If there’s a bomb next to an enemy, the bomb will kill the enemy before it has a chance to attack. So keep that in mind, especially when dealing with bombs.
Character builds
- You can actually plan out a character build, to a degree. Altar upgrades are semi-randomized, but some of them are constant. At Depth 4 you’ll always be offered the various Lunge skills, if you’ve unlocked them: Deep Lunge, Slashing Lunge, Sword Lunge. At Depth 6 you’re always offered Surge, Regeneration, or Agility. At Depth 8 you always get spear skills: Follow, Plant Spear, or Recall. And at Depth 10 you get the jumping skills: Winged Sandals, Staggering Leap, Swift Leap, and Leap Strike. You can use this information to plan your character build, knowing that, if you’ve unlocked any of these above skills, they’ll always be available at the listed depths. Also important to note is that these fixed-position skills are one-time-only offers. If you don’t take Winged Sandals at Depth 10, you’ll never get it again. You can never have a build with both Deep Lunge and Slashing Lunge. And so on.
- In addition to fixed altars, there’s a kind of hidden tech tree in the game. I’m fuzzier on this, but for example, the game will never offer you Greater Throw II unless you take Greater Throw first.
- Focus on lunges over throws. When it comes to long-distance killing, lunges are just better. A throw leaves you very vulnerable. A lunge keeps you in control. A throw doesn’t move you toward your destination. A lunge can get you where you want to go. While throws can be upgraded to be very powerful, these upgrades themselves are expensive and I believe they’re not worth the investment. Stick with lunges, unless you’re trying for a throw-based achievement, of course.
- I always take Quick Bash. It’s a “free” skill (no heart sacrifice) and it reduces your bash cooldown. The bash skill is critical, and getting to use it more often is helpful in almost any character build.
- When you get to Depth 6, always take Surge. The other skills are somewhat helpful but mostly pointless compared to Surge. Getting full energy/shield regeneration on a three-kill combo (which is very easy to get in later levels) is enormously helpful.
- When you get to Depth 10, always take Winged Sandals. It might be fun to take other skills, but if you’re going for a high score, Winged Sandals is the way to go. As Frank Lantz once said to me: “The point of the game isn’t to kill monsters. The point of the game is to get to the exit.” Winged Sandals, if you’re lucky, can get you to the exit in exactly two moves. That’s incredibly powerful.
- If I’m going for a high score, I try to end Depth 16 with 2 – 4 hearts. Having more hearts than that is not helpful, because by Depth 25+, if you’re not completely in control of the board, you’re completely out of control. That is to say: damage racks up quickly and tends to snowball: if you find yourself taking 3 damage in a single turn, you’re probably in such a bad place that you’ll take 3 damage next turn, so those extra hearts don’t really help. Better to spend those heart slots on skills that can ensure you never get into a bad place to begin with.
Specific skills
- Shielding Bash is an easy skill to unlock (see above, the second hint under “General tips”) and is very powerful. Any time you find yourself in a bad position, you can bash and not only will the bash work as normal (stacking with your other bash skills), but you’ll also get a temporary shield that means when the enemies attack, they do no damage for the rest of the turn after your bash. If you have a lot of bash powerups you can probably get out of your tricky situation through the application of a bash.
- Deep Lunge is worth taking if you’re planning a high score run. It can solve the very annoying problem of “there’s a wizard behind an archer, so if I lunge at the archer, the wizard will hit me”. (The main reason I think Deep Lunge is worth taking is that it costs no hearts to take.)
- Slashing Lunge is fantastic, and to me it’s worth the heart sacrifice cost. I was a little unclear on how it worked, and it took me a while to figure it out. I’ve drawn a diagram to describe the basic scenario for Slashing Lunge:
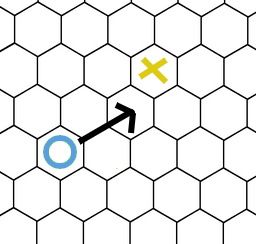 In the diagram, you’re the blue O and the enemy is a yellow X. With a basic build (no powerups), if you make this jump, it won’t be considered a lunge. The enemy remains and possibly does damage to you. With Slashing Lunge, you kill that enemy. With Slashing Lunge, if you jump into an enemy but you’re head-on for the border between two tiles rather than head-on for a full tile, you sort of “slash across” the two hexes on either side of the border in front of you, aligned with the vector of your jump. If you look at the diagram you’ll also notice that, combined with a basic lunge, this allows you to kill enemies three tiles away from you — rendering Greater Throw especially useless, since this can kill up to four enemies (described below) but also as I explain above, lunges are better than throws in general.Here’s the best case scenario for Slashing Lunge:
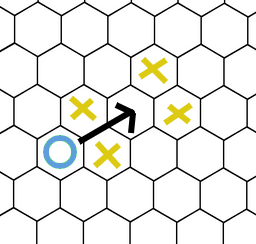 If you only have your starting build, you’ll kill the two enemies adjacent to you (since you’re technically jumping over them), but you won’t kill the two who were three hexes away. With Slashing Lunge you kill all four enemies. (This means there are a bunch of scenarios where you can kill three and two enemies using Slashing Lunge as well.)
Enemy behavior
- Wizards are a pain in the ass until you realize something critical: they won’t fire if there’s another enemy in their line of fire. Now, most players learn this and assume that means they won’t fire if there’s an enemy between you and the wizard. And that’s true. But it also goes for enemies BEHIND you that are in its line of fire (because the wizard beam passes through obstacles!). So here is scenario where it’s perfectly safe to move:
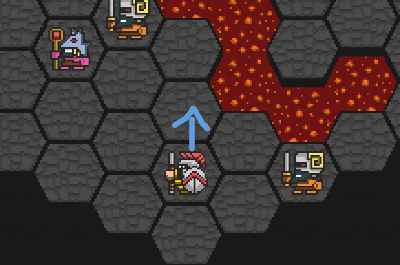 You can move into that spot and the wizard won’t shoot at you, because if he shot at you, he would also hit the swordsman on the lower right. This isn’t too helpful when wizards first show up, but it’s invaluable for Depths 10+ where the level starts to get really crowded. On crowded levels you’ll actually be happy to see a wizard, because they almost never get a chance to shoot! This does not apply to archers, because their arrows don’t pass through the first target, AKA if you are in an archer’s line of fire, it doesn’t matter what’s behind you.
- In the later game, a “wizard-archer corridor” is your friend:
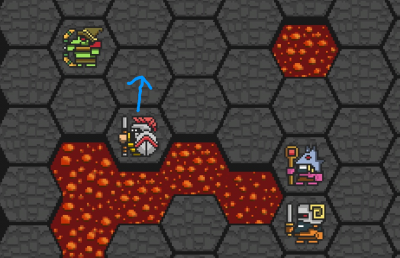 This particular move is completely safe due to the combination of “wizards won’t shoot allies” and “archers can’t attack adjacent squares”. On a crowded level, finding wizard-archer corridors and exploiting this safe spot is critical to getting through to the exit.Even safer than the wizard-archer corridor is the wizard-wizard corridor. The entire empty space between two wizards is safe, as long as there are no more than 4 empty tiles between the wizards.
- Demolitionists are tricky. Their attacks are unpredictable since very often they can throw a bomb at any of the six tiles adjacent to you. Their movement is also unpredictable, and they’ll very often move backwards even when you’re not specifically threatening them (the other enemies will generally move toward you unless obstructed or their only safe position is behind them). My general rule for demolitionists is: if they’re not congregating in a group they can be helpful to keep around (killing other enemies with their bombs), but if you are in the attack range of two or more and they happen to be in sync with their bomb throwing, you can end up in a really bad situation.
- This may seem counter-intuitive, but it can sometimes help to keep foot soldiers alive. Their movement is very predictable, which means they’re not very dangerous, and they act as mobile shields against archers and wizards. Also if you can kite them in the right formation and you have a combo-based special ability, you can always have a combo kill at the ready when you want it.
Specific achievements
- Atheist (return fleece using no altars) – this is the hardest and most rewarding achievement, since you’re winning on pure tactical skill. The best advice I can give for finishing an Atheist achievement is: keep at it. Keep in mind special enemy behaviors — exploiting wizard-archer corridors as noted above is key.
- Speed run (return fleece in 150 turns or less) – focus on making a straight line to the exit in each level. On Depths 1-9, don’t go for any altars unless there’s one almost right in the middle of the shortest path to the exit. On Depth 10, go out of your way to get Winged Sandals — this might result in you being left with just one health. That’s okay, because the idea with Winged Sandals is you’re only spending 2 or 3, max 4 turns per level. If you check you Conduct in the menu on Depth 5 and you have taken more than 50 moves, just start over. You might also hit a lava layout that messes up your plans, in which case, sorry, restart and try again.
- Demon partisan (return fleece killing no wizards or demolitionists) – on Depths 1-7, this should be pretty easy especially if you have good skills with the base build. Try and go for altars in Depths 1-7, and focus on building up your health. You should have a lot of hearts by Depth 8. In Depths 8-9 it’ll be really hard — here I wouldn’t bother with the altar unless it’s really easy to get to. You might end up spending a long time in the levels just to get through. In Depth 10, grab Winged Sandals from the altar. Depths 11-15 should be easy with the Winged Sandal jump: you can even be reckless, by jumping straight to the altar, taking a bunch of hits, doing Divine Restoration, and then jumping straight to the exit. Depth 16 should be pretty easy with Winged Sandals too.
